Wednesday, December 26, 2012
New Years Resolution
This year my husband and I have decided that we will have two resolutions one will be to workout, like we used to do before the newest addition to the family. The other is to not eat fast food for the entire month of January. This may not seem like a stretch for some people to do, but we will have to work harder to make sure this happens. When you break down the cost associated with us eating out for two at lunch during the week while we are at work, we spend an average of $20 a day. Yeap a $100 a week, some weeks I'm sure are less and some are more depending on where we eat. The hard part with this is that we work in a mechanic shop. We do have a small fridge there and can bring a crock pot to keep food hot in. There is also a microwave available to us, although I do not like to use them. We also average eating out with the family at least once a week for dinner, which can add up to $60 bucks if we are not careful, sometimes we can get away with $30. We also have a breakfast we sometimes splurge for, which ends up around $15 to $20 bucks every week or every other week. Pretty sad huh? So in just one week we could spend almost $200 in eating out. We want to stop this, and we are going to. I am very determined to make sure and have a few things on hand for eating and quick meals. Like bread, canned beans or stew, trail mix and peanut butter. All of which I will make or can. I am going to start making breads on the weekend and trail mix. I can usually make enough peanut butter to last a good week or so pretty fast, so I can make that whenever. I will also try and keep everyone updated so that we can share recipes and let you know how this is going for us. It wont be easy, and maybe sometimes I should except that I cant always make homemade bread or what not and buy it at the store. We received a super wave oven as a Christmas gift and I am excited to use it to make cooking faster, or at least that's what the book says it does. I am interested in trying new recipes also as ours have been on repeat for a while. What recipes are your favorites for a quick meal? How do you keep in budget and not eat out so much?
Thursday, November 1, 2012
Chili Mac

I like quick filling meals, I also love chili. On days when time is short but I want chili I make chili mac. Its easy, simple and could easily be a one pot meal. I boil the noodles separately though, so for me its a two pot meal. My Mom used to make something like this for us growing up but called it Slop. Whatever you call it, its good, warm and I don't usually have lots of leftovers. Here is my recipe:
Chili Mac
1 or 2 pounds of hamburger meat or venison
1 onion diced
Garlic
Elbow noodles (or noodles of choice)
1 can of tomato's diced or crushed
2 cans of tomato sauce
1 or 2 cans of beans ( I use ranch style or pintos, but I rinse the pintos)
1 can of corn (optional)
Chili powder (to taste)
Cumin (to taste)
I cook the hamburger meat with the onion and garlic until done. While I do this I cook the noodles. I make sure the pan I cook the meat in is big enough to accommodate everything. When the meat is done, drain and add tomato's, tomato sauce, beans and corn (if adding), cook over a medium heat. When the noodles are done add them too, stir well. Add chili powder and cumin powder until desired taste is achieved. For me it takes very little cumin, but lots of chili powder. Cook this together for a bit and taste again, it always seems to me that the taste changes a bit and I have to add more things. Some people might be taken back by adding the corn, but it is awesome. You can also add the corn in with the leftovers the next day to make them go farther and eat it plain the first night. I like to serve this with corn bread. The taste will seem more like homemade chili if you use plain pintos rather than ranch style beans, but it is great both ways. If you want you can cook your noodles in the pan with the meat, you might just have to add a little water.
Monday, October 29, 2012
Halloween fun
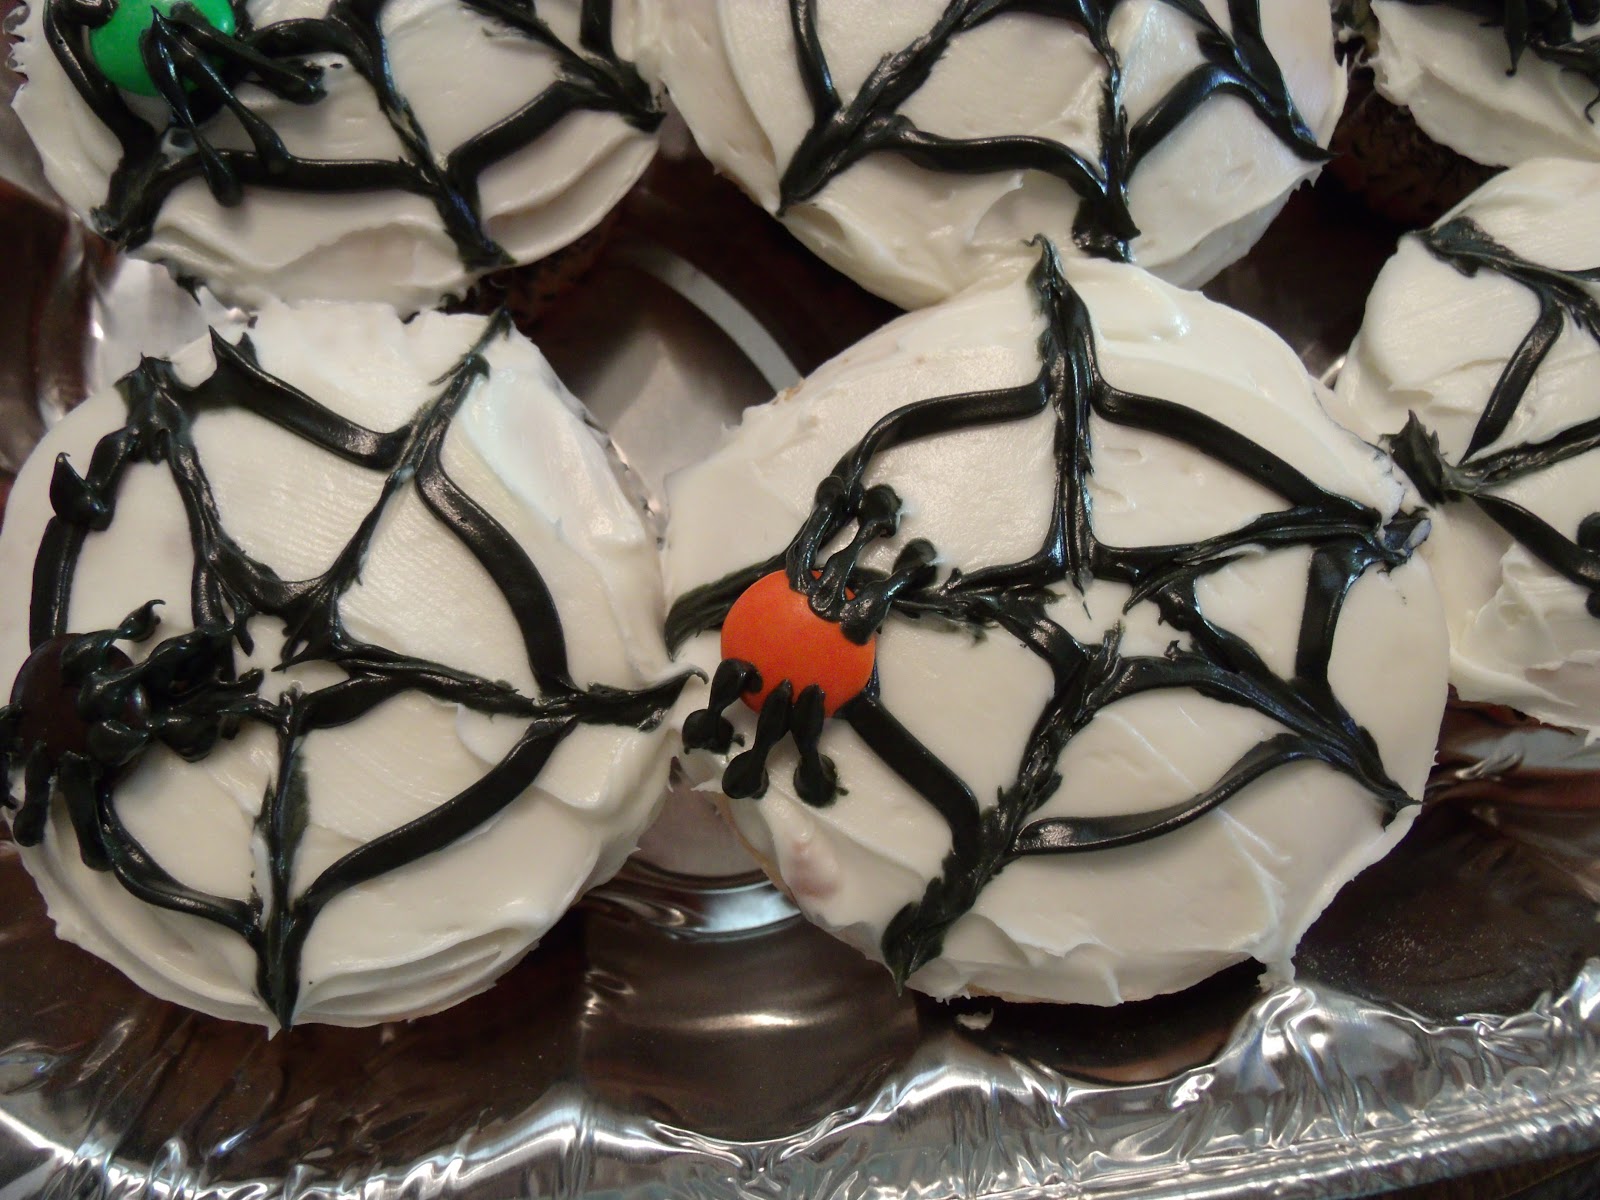
I made a two different treats for the cake walk at cub scouts. I made spider web cupcakes and finger cookies. To make the cupcakes I used a regular box cake mix and frosting. I baked it according to the directions on the box. When cooled I frosted them lightly, mostly just enough to cover the cake.

Make sure you smooth it out kind of good. Then take some of your frosting and put it in a bowl and mix it with black food coloring until it is the desired color.

Put this colored frosting into a piping bag or a zip lock bag I grab the corner I want to cut and push it through the inside of the bag, and fill my hand up with frosting. Then I pull my hand back through and the frosting is just in the corner and not all over the bag.

I could not get a good picture of the frosting in my hand since I was taking the picture myself. Next clip a tiny, tiny piece off the corner of the bag. With your piping bag make a small circle in the center of the cake and a bigger circle around it.

I only do a few cupcakes at a time, because I get bored easy and I need to keep changing what I am doing. Anyway, once you get some done you will need a toothpick or in a pinch a skewer. I hadn't realized we were out of toothpicks until it was too late. Next take your toothpick and start at the center line drag the toothpick through the black icing connecting the lines and going past the outer line. I usually make 5 or 6 lines on each cupcake.

This is when I realized I had made the lines too thick. I had to use the other corner of my bag and make the hole smaller. Next after the web is made you take an m&m and put it some where on the web. Using the black icing make little legs off the sides of the candy.
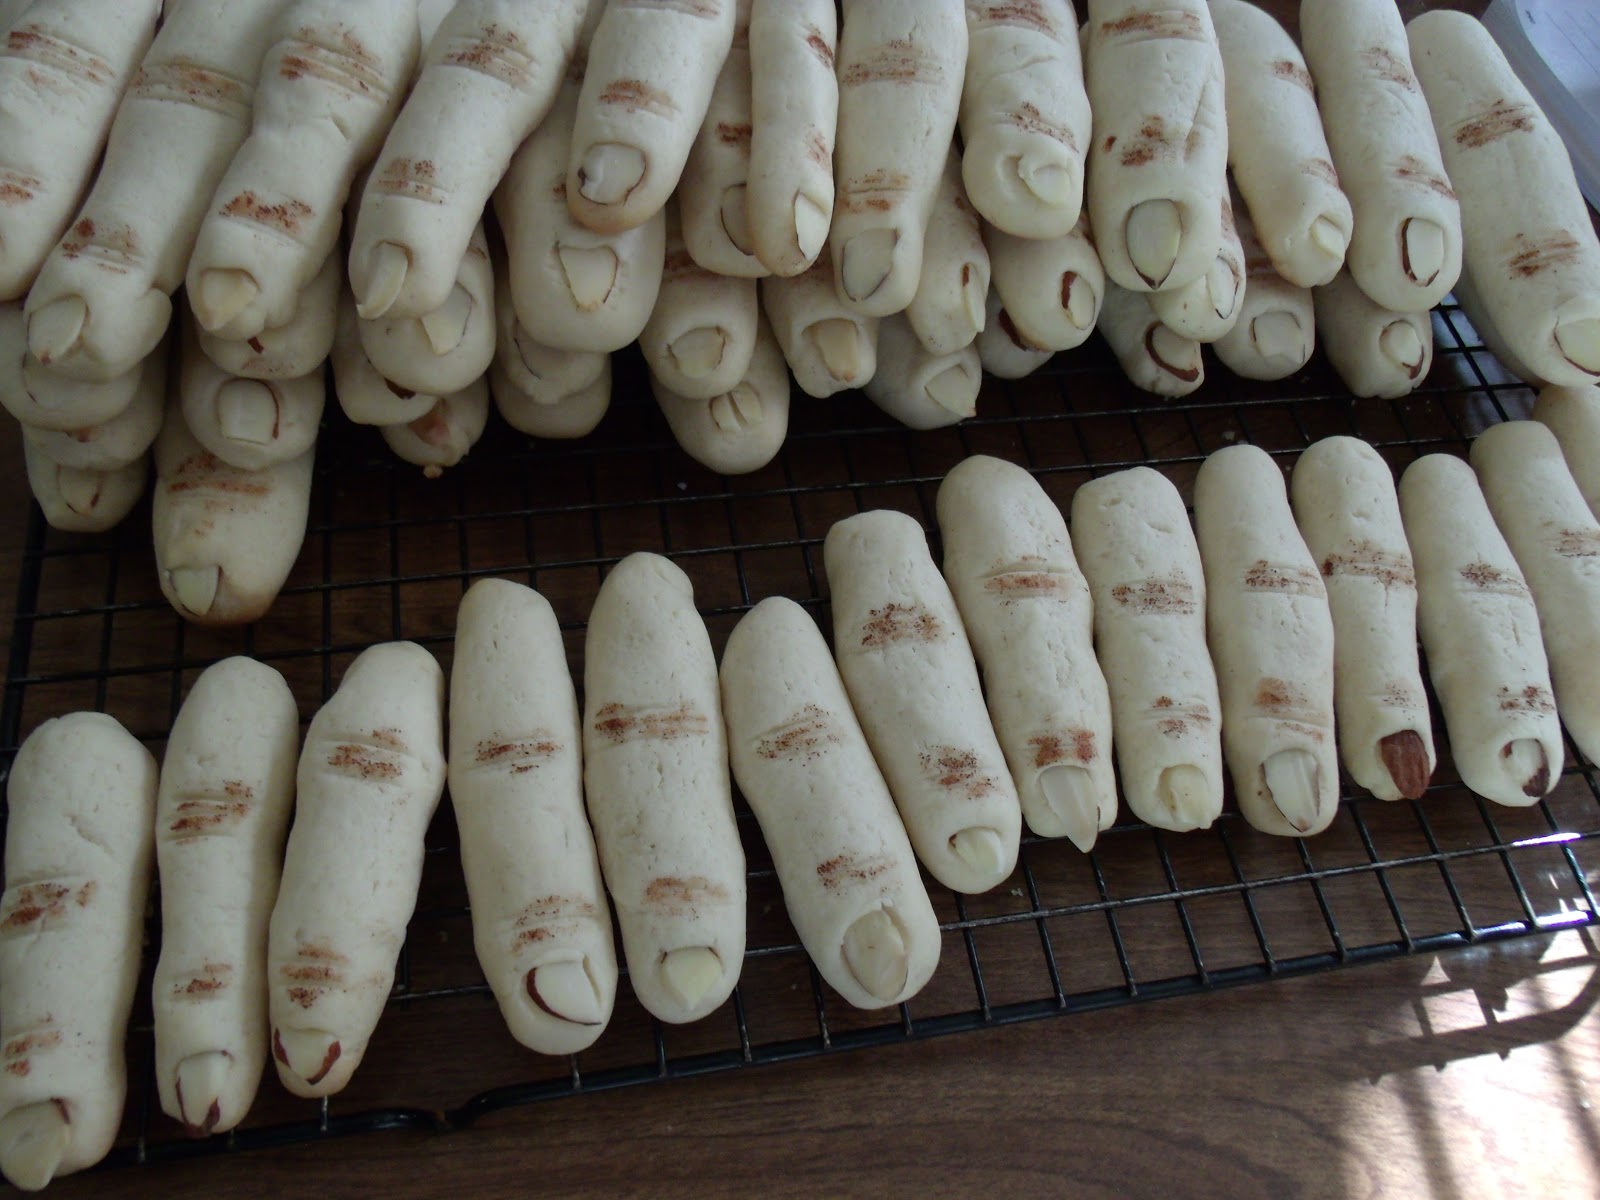
Next up we made sugar cookie fingers. I used the same recipe I have used before and you can find it here. After the cookies chilled we rolled them out like a snake and used sliced almonds to make finger nails. I used a butter knife to make the slits on the knuckles. After the first pan was out of the oven we realized we used too much dough. Our cool fingers turned into fat fingers. So we made them skinny almost boney looking and they turned out better.

I also dusted cinnamon over the slits, they look pretty awesome and I hope the boys like them at scouts. Whats your favorite halloween treat?
Tuesday, October 9, 2012
Stuffed Jalapenos
I love spicy food, so much that I grow at least two jalapeno plants every year. I love tabasco peppers too, oh and banana peppers. Anyway, before an impending frost I picked and the large ones. I have been letting them get to a big enough size so we could stuff them. The recipe I use is simple and I don't know who originated it, it was told to me a long time ago. I didn't get as many pictures as I'd like, but I got the one that show how to cut them. Always make sure you wear gloves, and I recommend a well ventilated area too. These were so spicy just cutting and de-seeding made me cough.
Stuffed Jalapenos:
Ground meat- cooked, drained, and cooled slightly
Cream cheese- warmed up a bit
Bacon
Jalapenos
Toothpicks
I didn't put an amount because it all depends on how many jalapenos you get. We had about 14 or so and used a pound of ground meat, one package of cream cheese and two packages of bacon. Rinse the jalapenos cut a slit down the center length wise, not cutting through the pepper. Make a horizontal slit at the top and bottom of vertical slit, making sure not to cut through the pepper again. Its ok if you accidentally chop through it, you can finagle it and wrap the bacon so it holds on most occasions. Gently pull your sides open and cut out seeds and membranes, or leave them in up to you. You get more stuffing in without it though.

Cut open and ready to stuff.
This is the only picture I got, but it shows you how I cut mine open. Ok once you have them cut open I rinse to get out any extra seeds that may be hiding. Mix your cream cheese and browned ground meat until smooth. It works best if meat is warm and cream cheese is warmer too. Stuff your peppers until the meat mixture is poking out a bit. Take your bacon and wrap one piece around the jalapeno and secure it with the tooth pick. Now this may sound easy, but when you have cream cheese mixture on peppers and gloves, then bacon in the mix it can get tricky. I try to get the tooth pick through the start and end of the bacon piece. Then cook until bacon is done, I like it grilled. This is the part I wish I had taken another picture. They are delicious and spicy, we had some so hot I could barely eat them. How do you use your peppers?
Thursday, September 27, 2012
Super Energy Balls a decent after school snack (kinda)

I am not much for having processed cereals around, but it so happened in the last few months that we needed a quick breakfast on more than one occasion. On the side of the box of Tasteeos is a recipe my boys have asked for me to make repeatedly. I finally made it and its actually good. Here is the recipe on the box:
Super Energy Balls
1 cup of peanut butter
2 tbsp melted butter
1/2 cup of honey
1/2 cup non fat dry milk powder
1/2 cup of raisins
2 cups Tasteeos cereal (cheerios like cereal)
1/2 to 2/3 cup flaked coconut
Combine peanut butter, butter, and honey stir well. Stir in milk powder and raisins. Add cereal, stir until evenly coated. Drop 1 tsp mixture into coconut and roll into a ball. Repeat and store in an airtight container in refrigerator.
The box says it makes 5 dozen, well I was lucky to get two dozen. It was hard to finish mixing and I had to use my hands. The coconut didn't want to stick either. I think most of my problems was my peanut butter, its a natural kind and has to be refrigerated. If it was warmer it would have been easier to stir. Even my husband loved these, in fact I made them yesterday and there is 3 sitting in the fridge this morning. My husband even gave me a new idea, to coat them in chocolate. Sounds super healthy right? So I got some almond bark and I am remaking them today.
Update- I am so eating one right now covered in chocolate. I think we have a problem because these rock! I just chopped some almond bark and melted it in my redneck double boiler (aka a steel bowl on top of a pan with boiling water) since we do not have a microwave. I coated the balls and let dry on wax paper. When the chocolate got too cool the coconut fell of more, but otherwise they held together great. These are definately on my remake on special occasion list!

Wednesday, July 18, 2012
Apple Sauce, Apple Butter, Apple Juice Canned

Peels and cores for juice.
When you get the desired amount of apples cut and peeled, just pour out the water and add new to cook. I kept the water line about half way up the apples for the sauce/butter and cover the peels with water for the juice. Now you can cook the apples for about 20 minutes or until they are soft, on high, I cook the juice pieces on low for a while until they fall apart. I take the easy route on the pureeing part, I use my potato masher and squish it up. If you like it chunky then don't squish so much, or do it more for smoother texture. If you still don't like the texture you can always let it cool and blend it. At this point you have apple sauce. I add sugar to taste, I really don't have a recipe. For me it depends on the sweetness of the apples and who intends to eat it. I make it a little sweeter for my kids and a little less sweet for my Grandpa. If you want to keep it as apple sauce return it to a good boil and can it from here. Leave a 1/2" head space, remove air bubbles and process for 20 minutes in boiling water canner. If you want apple butter and some spices to the mashed up apples. I detest cloves, so I make mine with cinnamon and nutmeg. I just add these to taste and then I cook it a few minutes and taste it again. When you get the taste right turn it down to low and let it cook for a bit. Stir it often, and when it mounds up on a spoon it is ready to can. How long does this take? It depends on how much water you added to the apples when you first cooked and how much sugar you added too.
Mounded up on spoon.
When the apple butter is cooked down, it is ready to can. Leave a 1/4" head space and process for 10 minutes in a boiling water canner. Now your juice pan has been cooking away this whole time, turn it off and let it cool. When cooled a bit, strain it through cheese cloth, or a clean dish towel. Discard the peels and cores and the leftover is your juice. If you are going to can it heat it back up, then ladle it into your jars leaving a 1/4" head space and process for 10 minutes in a boiling water canner. You can get so much out of apples and your house smells great too. I hope you have fun with them.
Wednesday, July 11, 2012
Oreo Pie
If you have never made oreo pie you are missing out on something tasty, unless you hate oreos. I make mine as simple as possible. I remember reading the recipe years ago and I forgot where I found it. Here is how I make it:
Oreo Pie
1 package of oreo's
butter
2 packages of chocolate pudding powder mix
cool whip or whipped heavy cream
2 cups of milk
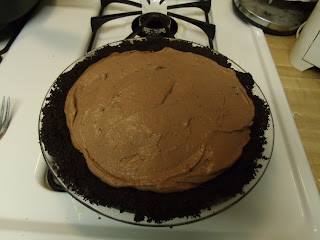
If you don't want to mess with making a crust they sell pre-made oreo crusts at most grocery stores. If you want to make it crush up or chop all the cookies, but leave two out. Melt some butter and mix it with the crushed oreos until in will stick together when pressed. Press it into a pie pan until a nice crust is formed and bake for about 10 minutes so it will set. Mix pudding packages with 2 cups of milk and mix well. Pour half of the pudding mixture into the pie crust and spread it out evenly. mix the rest of the pudding mixture left in the bowl with half of the whipped cream or cool whip. (You don't have to whip it until it has super stiff peaks) Pour this mixture into the pie pan on top of the first pudding. You will now have two different colors in your pie.

Oreo Pie
1 package of oreo's
butter
2 packages of chocolate pudding powder mix
cool whip or whipped heavy cream
2 cups of milk
If you don't want to mess with making a crust they sell pre-made oreo crusts at most grocery stores. If you want to make it crush up or chop all the cookies, but leave two out. Melt some butter and mix it with the crushed oreos until in will stick together when pressed. Press it into a pie pan until a nice crust is formed and bake for about 10 minutes so it will set. Mix pudding packages with 2 cups of milk and mix well. Pour half of the pudding mixture into the pie crust and spread it out evenly. mix the rest of the pudding mixture left in the bowl with half of the whipped cream or cool whip. (You don't have to whip it until it has super stiff peaks) Pour this mixture into the pie pan on top of the first pudding. You will now have two different colors in your pie.

This is the second layer.
I didn't use all the second mixture of pudding in the pie, I just didn't have enough room. So the kids ate it, lol. Take the rest of the whipped cream or cool whip and put it on top, I usually take the time to cover all the chocolate. Then take the two leftover cookies and rub them together over the top of the pie, it makes cute little sprinkles. Be sure and let it chill a bit before serving!

Finished pie!
Subscribe to:
Posts (Atom)